What an all-in-one saltwater tank is
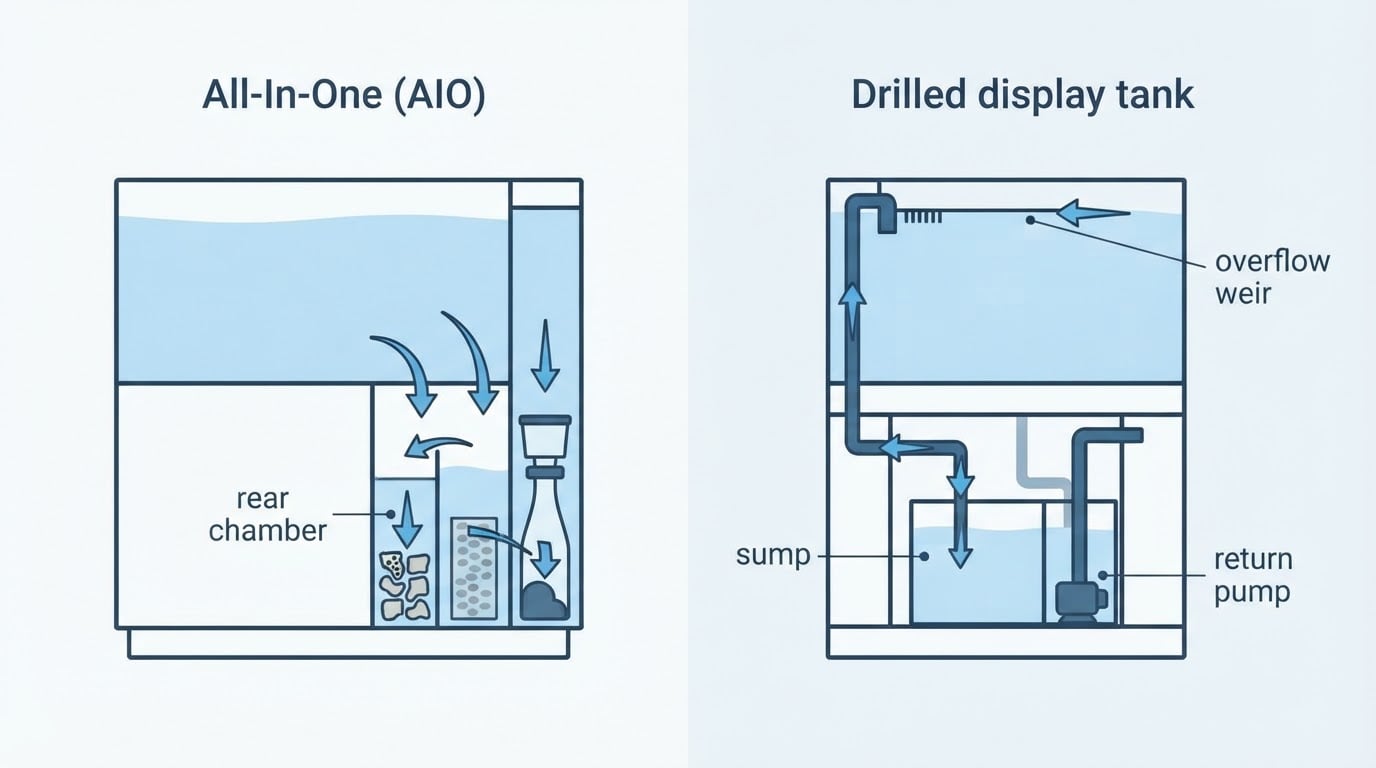
An all in one saltwater tank—usually written AIO—is a display tank with its filtration built into the same body as the aquarium, almost always a partitioned compartment behind the back glass or along one side. Water spills over a weir at the water line, passes through that compartment, and a return pump pushes it back into the display.
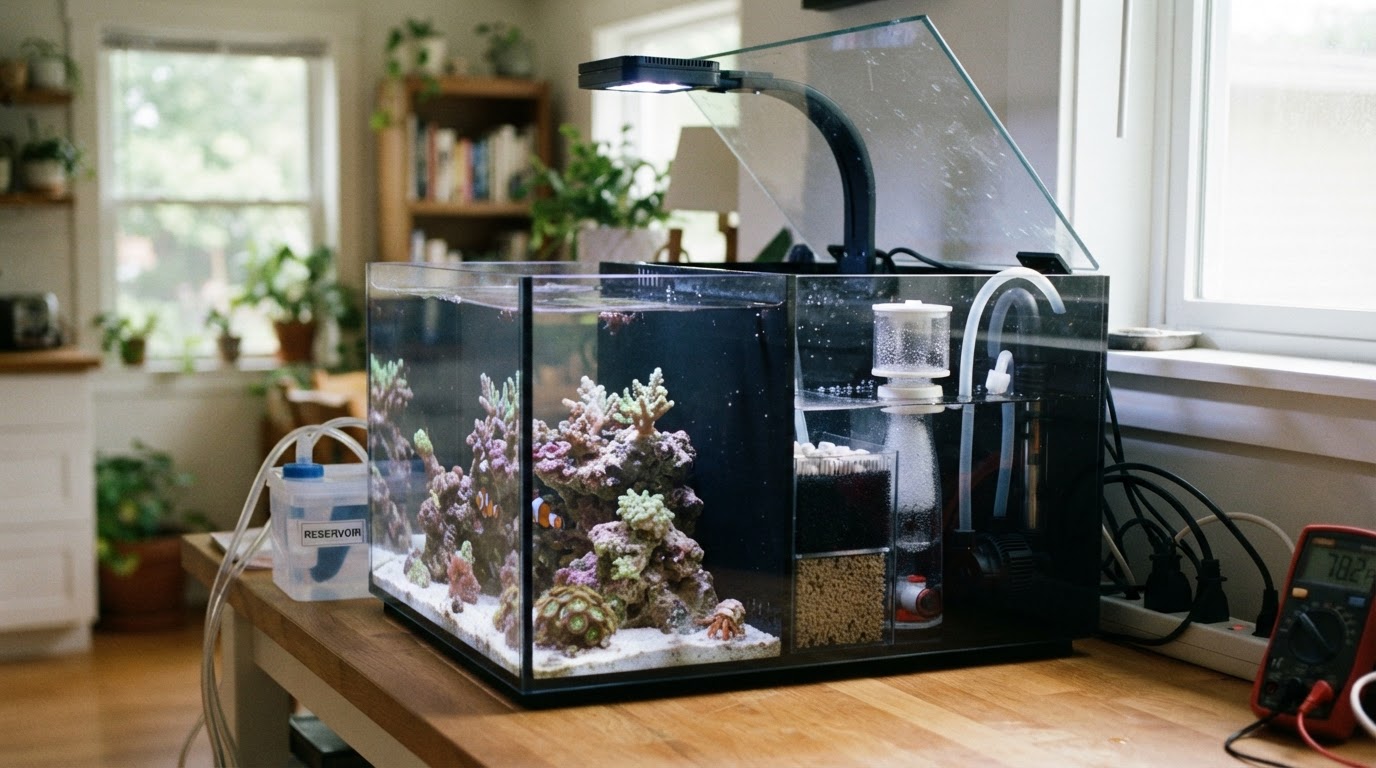
Here the comparison is a rear-filter AIO without an external sump loop. Its return path is contained in the aquarium rather than running down to a separate sump cabinet. Verify the particular tank's plumbing and accessories.
It does not remove every water risk: the display still holds water at the weir line, the rear chamber holds a pump and possibly a skimmer, and a hose, fitting, or pump seal can leak.
An integrated layout by itself does not establish filtration performance. Its main trade-off is a fixed equipment bay instead of the larger, adaptable space a separate sump can provide.
If you are starting a marine tank for the first time, the saltwater tank setup guide covers the general sequence; this article sticks to what changes when the filtration is inside the tank.
How water moves through the rear chambers
Most rear chambers follow a similar order: water leaves the display through a weir or overflow teeth at the surface, passes a mechanical stage, then biological or chemical media, then a return chamber, and the pump sends it back through a nozzle or split return.
- Overflow and weir. Surface water crosses the teeth and drops into the first compartment. Some designs use a narrow surface skimmer box; others use a full-width weir. A clogged comb reduces surface skimming before it reduces total flow, so the display can look clear while a film builds on the surface.
- Mechanical filtration. Filter socks, filter floss, or a roller mat catch particulate matter. Whichever the tank uses has to be changed or cleaned on a schedule, not only when the water looks dirty.
- Biological and chemical media. Biological media hosts nitrifying bacteria; carbon and phosphate removers are chemical stages. Baffles set the water level in these compartments, so media bags sit submerged rather than tumbling.
- Return chamber. This compartment holds the return pump. In many AIOs it is also the one whose level falls as water evaporates, but baffles decide that. Check your model's manual instead of assuming every AIO has one chamber that drops.
- Return line. A nozzle, a split return, or a small manifold sends water back into the display. Aim it for surface agitation and gentle movement across the rock, not a single jet blasting one corner.
Red Sea's MAX NANO G2 documentation gives one concrete example. In that series, water goes from the surface skimmer to a filter sock, then a protein skimmer, then a media chamber and bubble trap, then the return pump. The Cube and Peninsula models use a 950 LPH return pump, the XL uses 1,550 LPH, and the XXL uses two 1,550 LPH pumps (Red Sea MAX NANO series). Those are manufacturer flow ratings, not measured flow at the nozzle after head loss, media clogging, or the return fitting. Use the sequence to understand how a rear chamber can be organized; do not assume another brand's baffles, chamber order, or included equipment match it.
Chamber order and baffle heights decide what will actually fit. A skimmer needs a compartment with a stable level and enough footprint, and that requirement usually eliminates more candidate models than the display volume does.
When the return chamber level drops
A falling return chamber does not always mean evaporation. A clogged filter sock, filter floss, or roller mat can back water up in the compartment before it and reduce flow to the pump. A blocked overflow comb can reduce what enters the rear chamber.
Before adding water, check the mechanical stage, the weir, and the pump intake. If the chamber is low because filtration is blocked, topping off adds water that will raise the level again once you clean the filter, and salinity will drift low. Clean or replace the blockage, let the level settle, and then decide whether the tank actually lost water to evaporation.
If the return pump has been running with too little water, switch it off until the chamber is back at its working level.
What one AIO package includes—and what it doesn't
A typical AIO package includes the display with its integrated overflow, a return pump, and media baskets. Beyond that, inclusion varies widely: a protein skimmer, an LED light and mount, a glass lid or mesh screen, a stand, filter socks or a roller mat, and a heater clip or compartment may or may not be in the box.
The Red Sea MAX NANO G2 example shows why the parts list matters. The Cube and Peninsula versions include a 1.5 L RO top-off reservoir, and the XL includes a 2.7 L reservoir; the XXL does not include that automatic top-off. ReefATO+ and NanoMat are compatible add-ons sold separately, not parts of every package (Red Sea MAX NANO series). "All-in-one" describes where the filtration sits, not a promise that every accessory is supplied.
The only reliable authority is the inclusion list for the exact model and size you are considering. Product families reuse names across sizes, and the same name can ship with or without a light, skimmer, or lid. Treat "complete system" as marketing language until you have read the parts list.
What to budget for beyond the package
Compare the exact inclusion list with the equipment you need: suitable heating and temperature monitoring, salt mix, purified water, salinity and cycling tests, rock or substrate, and maintenance supplies. Check the rear compartments before buying a heater or skimmer. For top-off, confirm both the controller and reservoir; a compatibility claim does not mean either is included.
Evaporation, top-off, and salinity: a worked example
Evaporation removes water and leaves the salt behind, so salinity rises until you replace the lost volume. An automatic top-off handles that by adding fresh purified water to the return chamber. It does not replace saltwater.
Here is the arithmetic with round numbers. Suppose the system holds 40 L at 35 ppt and loses 1 L to evaporation. The salt amount is unchanged, so the concentration is approximately:
35 × 40 / 39 ≈ 35.9 ppt
That is an illustrative calculation, not a measured result from a particular tank. It assumes the 40 L and 35 ppt figures are accurate, that no saltwater spilled or was removed, and that the volume-concentration relationship is close enough for an estimate. Real tanks also have rock, sand, and equipment displacing water, so the actual water volume is lower than the nominal display volume.
Replace the evaporated liter with fresh purified water, not saltwater. If you top off with saltwater, you add salt that has nowhere to go and salinity keeps climbing.
This is different from a water change. In a water change you remove saltwater and replace it with new saltwater mixed to the same salinity, so salt leaves with the old water and returns with the new. Match temperature and salinity, and mix the replacement batch separately before it goes in. If you want to estimate how quickly your own tank loses water, see the guide to reef tank evaporation rate.
Commission the rear chambers before livestock
Use the tank's installation manual for leak testing, leveling, component placement and the initial fill. Keep the weir clear of rock and confirm access to the return pump. Follow the sand label rather than rinsing every product: packaged live sand and dry sand can have different instructions.
Mix replacement saltwater in a separate container according to the salt maker's instructions and verify salinity and temperature before adding it to a populated system. Do not add dry salt around livestock.
With the return pump operating normally, establish the working chamber level specified by the tank manual. Put the top-off sensor in the location its instructions require; do not choose the quietest-looking compartment by appearance alone. Check pump-off and restart behavior before leaving the system unattended.
Before the first fish: cycle check and stocking
A fishless cycle needs a deliberate ammonia source, not just time with water circulating. DrTim's Aquatics fishless cycling guidance describes adding an ammonia source and treating the cycle as ready when the tank converts that ammonia with no residual nitrite within 24 hours (DrTim's fishless cycling guidance). Follow the instructions for the exact product you buy; ammonia concentrations and dosing differ between products, and a dose copied from a different bottle can stall the cycle or overload the tank.
A single zero ammonia reading in an unfed tank is not proof that the filter can process a fish's waste. The bacteria need to have handled a measurable ammonia load and cleared the nitrite that follows. If you have only ever seen zero because nothing was added, the tank has not demonstrated that capacity.
Before the first fish, confirm stable salinity and temperature, completed processing of the instructed ammonia challenge, and suitable nitrate and other water parameters for the planned livestock. A nitrate reading on its own is not the completion test.
Build the species list from adult swimming space, feeding and territory needs, then compare it with the display footprint and usable filtration equipment. A gallon band alone does not authorize a particular fish.
There is no reliable "one inch per gallon" conversion, and no gallon band by itself makes a particular fish safe. Add fish one at a time and test between additions. A cleanup crew is not a mandatory first step; add animals when the tank can feed them and the filtration can process what they produce. A fixed two-week waiting period after the first fish is not a substitute for testing either—use ammonia and nitrite readings after each addition to decide when the next one is safe.
Maintenance access and a safe routine
Access is the part of AIO ownership you live with weekly, and it is worth checking before you buy. Can you lift the return pump out with the tank against a wall? Can you reach the bottom of the skimmer compartment with the lid on? Does the media basket come out without removing the pump?
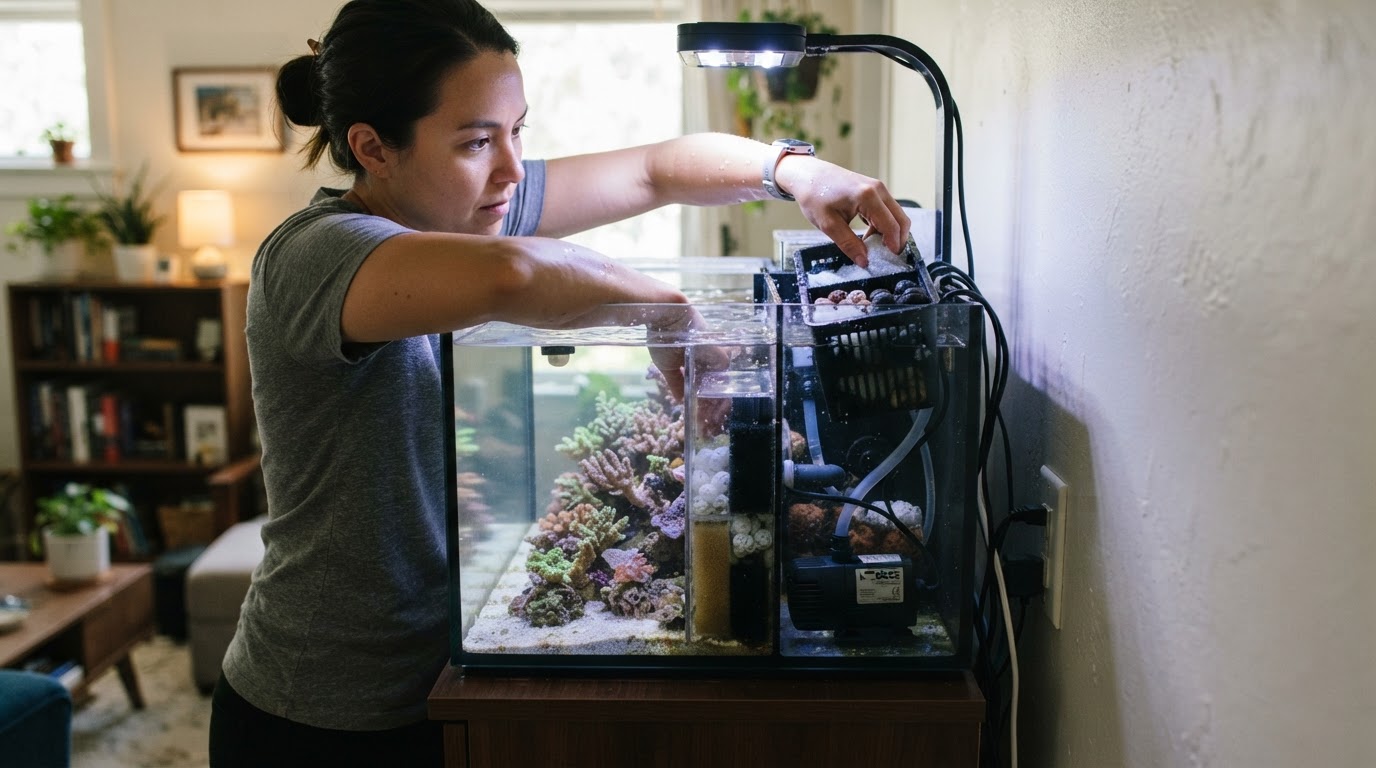
Follow the model's cleaning intervals and inspect the mechanical filter and return level regularly. Recheck levels after replacing media or removing equipment.
Before any maintenance that lowers the water in the rear chamber, switch off the return pump and the heater. When the pump stops, water above the weir drains into the rear chamber and its level can rise, so watch it. Disable the automatic top-off before a water change or pump service so it does not add fresh water while the chamber is intentionally low; turn it back on only after the chamber is back at its working level. Keep the water above the heater's marked minimum line whenever the heater is powered. A heater that runs dry or is switched on out of water can overheat and crack, and the same applies when you drain a chamber for cleaning. Route cords with a drip loop below the outlet so water drips off before it reaches the plug, and keep power strips off the floor. The guide to unplugging an aquarium heater for a water change walks through the shutdown order.
When you restart, fill the return chamber to its working level first, start the pump, and watch the display and chamber levels until they settle. Check that the ATO is reading normally before you leave it unattended. If the return chamber level is not where the manual says it should be, stop and find out why rather than topping off until it looks right.
Water changes in an AIO are straightforward if you plan the hose route in advance. Siphon from the display, replace with matched-temperature saltwater mixed separately, and restart the return pump only when the chamber has enough water to run safely.
What to confirm before buying
Compare specific tanks, not categories. These are the questions to answer before money changes hands:
- Display volume and footprint. Compare against the fish you plan to keep at adult size, not a gallon-per-fish rule.
- Rear chamber dimensions. Ask for compartment measurements, not just display gallons; those measurements decide which skimmer, pump, and media fit.
- Return pump model and parts. Confirm the model number and whether replacement impellers are available.
- Overflow and weir design. Look for a removable comb and an accessible first chamber, because that is where surface skimming and clog problems show up.
- Lid or open top. Check whether a mesh top is included and how it fits around the light; the choice affects evaporation, heat, and jump risk.
- Light mounting. Confirm the bracket, coverage, and whether the light is included.
- Stand and leveling. Check for adjustable feet or a leveling plan; an unlevel tank stresses seams and doors.
- Cord routing. Confirm there are cutouts and a path that keeps plugs away from water.
- Top-off compatibility. Identify where the sensor sits, whether a reservoir is included, and where your reservoir will go.
- Skimmer fit. Measure the compartment against a specific skimmer footprint before buying.
- Glass or acrylic. Decide which surface you can maintain without scratching.
- Parts and support. Confirm availability for the pump, impeller, lid, and any proprietary media basket.