What a Complete Saltwater Setup Actually Requires
Saltwater tank setup is usually sold as a shopping list, but the equipment only works as a system. A tank holds water, rock and sand house the bacteria that process waste, a skimmer and mechanical media remove what the bacteria cannot, and a heater, pump, and light keep the environment inside the range your animals can tolerate. Miss one layer and the others cannot compensate.
For a first marine tank, the minimum equipment set is:
- A tank with a level stand rated for the filled weight
- Live rock or dry rock, plus sand if you want a substrate
- A protein skimmer, or a deliberate alternative nutrient-export plan
- A return pump and one or two wavemakers for circulation
- A heater sized for the room, plus a separate thermometer
- A light fixture appropriate to fish-only or reef stocking
- Marine salt mix, RO/DI water, a refractometer, and a mixing container
- Test kits for ammonia, nitrite, nitrate, pH, alkalinity, and salinity
The direct answer to "what do I need?" is therefore not a single product. It is a matched set sized to the tank and the animals you intend to keep. Everything below is a decision about one part of that set.
All-in-One or Sump-Equipped?
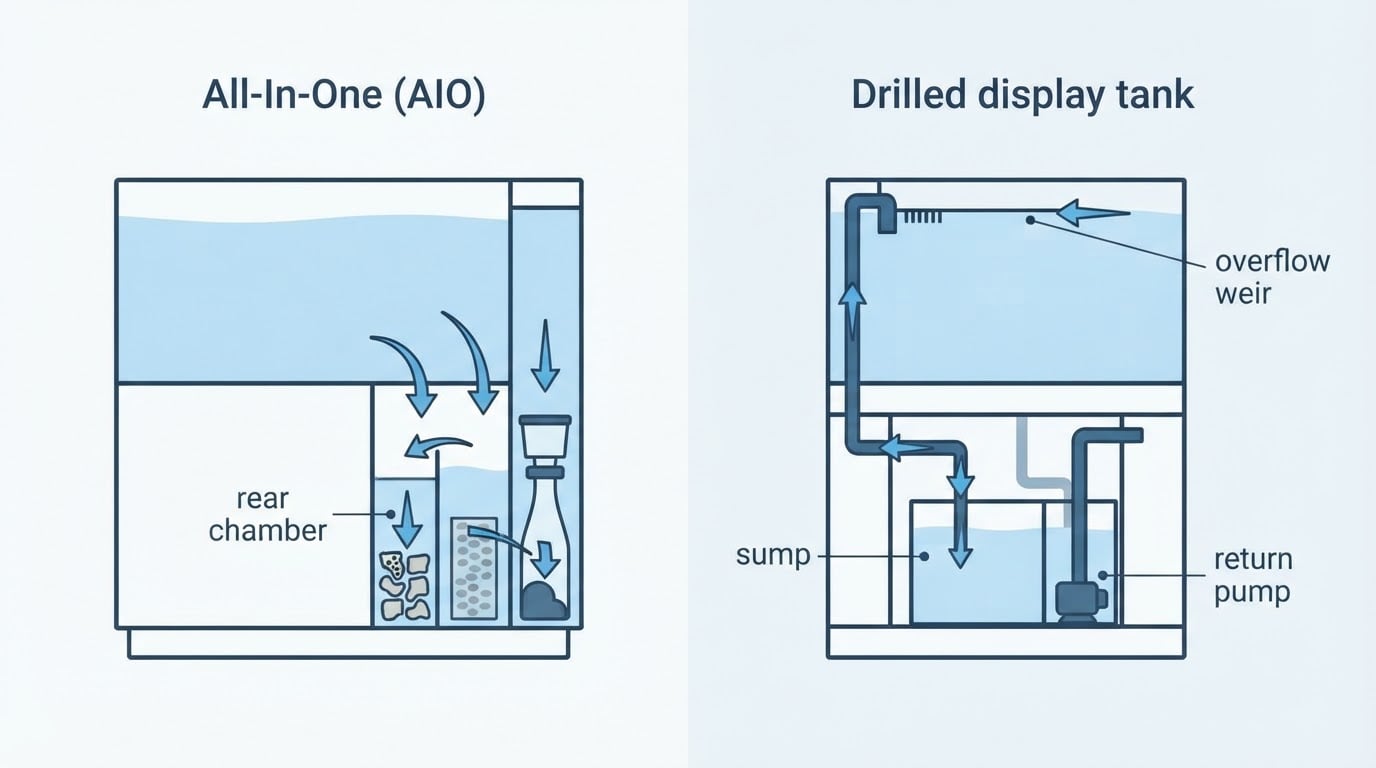
An all-in-one tank has filtration chambers built into the back or side of the display. Water passes through media and a pump returns it to the tank. This design removes plumbing from the project, keeps the footprint small, and reduces the number of leak points. The limitation is space: rear chambers restrict which skimmers fit, evaporation shows up in the display, and the chambers take volume away from the swimming area. Access for maintenance can also be tight.
A sump-equipped tank drains to a separate container below the display, where the skimmer, heaters, and return pump live. A sump hides equipment, adds water volume, makes maintenance easier, and leaves room for a refugium. The trade-offs are real: an overflow and plumbing add failure points, the system can be noisier, it needs cabinet space, and tuning the drain and return takes patience.
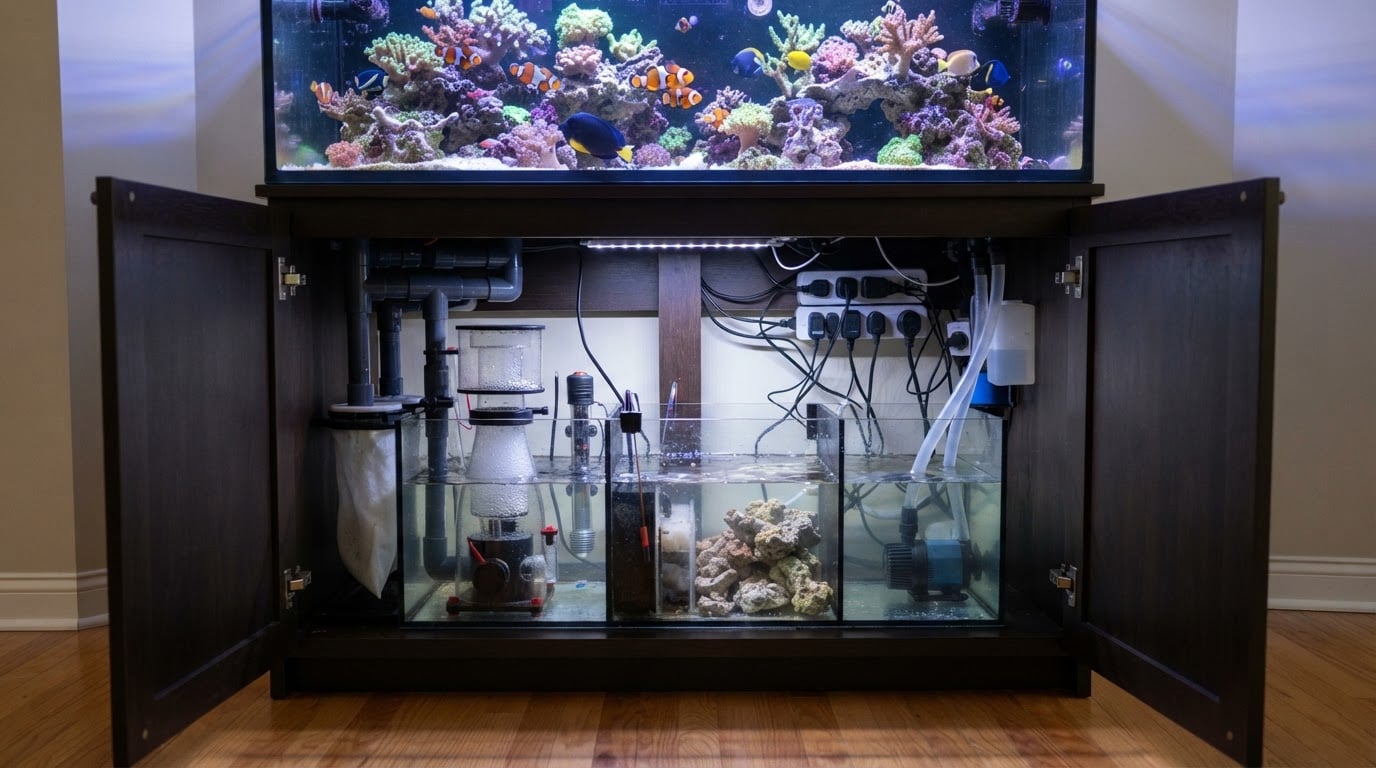
Neither layout is inherently better. An all-in-one is the simpler choice for a small tank in an apartment or a room where plumbing is impractical. A sump is the more flexible choice for a larger system or a reef tank with heavy equipment demands. What a sump does not do is replace maintenance: it moves the work out of sight, not out of the schedule.
Pick a Tank Size You Will Actually Maintain
Tank size is a maintenance decision before it is a stocking decision. Rough ranges help:
- 5 to 10 gallons: a nano system. Small water volume means salinity and temperature move quickly, and stocking options are limited. Suitable for a patient keeper who tests often and accepts fewer fish.
- 20 to 40 gallons: the most practical first marine range. There is enough rock for a real biofilter, room for a skimmer, and enough water volume to soften small mistakes without turning water changes into a project.
- 50 to 90 gallons: more stable temperature and salinity, more stocking options, and easier equipment access. The costs are weight, stronger lighting, larger water changes, and more time per week.
- 100 gallons and up: stability and space, with a corresponding jump in equipment, floor support, and maintenance time.
Footprint matters as much as gallon count. A long, shallow tank gives swimming room and lets light reach the bottom without extreme intensity. A tall tank looks dramatic but needs stronger lighting and is harder to reach into for cleaning or coral placement. Measure the space, confirm the floor can carry the filled weight, and choose the largest tank you will still service on a bad week.
Live Rock, Dry Rock, and Sand
Rock is the biological filter. Its porous surface hosts the bacteria that convert ammonia to nitrite and nitrite to nitrate, and it provides the structure fish use for territory and shelter.
Live rock arrives colonized with bacteria, coralline algae, and hitchhikers. It can shorten the cycle and add biodiversity, but it can also bring pests such as aiptasia anemones, flatworms, or mantis shrimp. Inspect it, and cure or quarantine it if you cannot identify what is on it. Dry rock starts clean, lets you build the aquascape you want, and avoids hitchhikers, but it takes longer to seed and supports less life at the start.
A practical compromise is mostly dry rock with a small piece of established live rock or a bottled bacteria product to seed it. That combination gives you control over the layout without starting from zero.
Sand is optional but useful. A shallow layer of aragonite sand, roughly one to two inches, adds surface area for bacteria and dissolves slowly to help hold alkalinity. Crushed coral is coarser and traps detritus more readily. A bare-bottom tank suits high-flow systems and makes cleaning easier, while a deep sand bed is a long-term commitment that needs planning rather than accident.
Place rock directly on the bare glass bottom, then add sand around it. Rock stacked on loose sand can shift when a fish digs or a wavemaker pushes water along the floor.
Filtration Does Three Different Jobs
Filtration in a marine tank means mechanical removal, chemical polishing, and biological processing, and no single device does all three well.
Mechanical filtration, such as filter socks, rollers, or sponges, catches particles before they break down. Chemical media such as activated carbon or phosphate remover is optional and should be used for a specific problem rather than as a permanent cure-all. Biological filtration happens in the rock, the sand, and any biomedia you add: that is where ammonia and nitrite are actually converted.
A protein skimmer is the main nutrient-export tool in most marine systems. It removes dissolved organic material before it becomes nitrate. Small tanks can be run without one if you commit to frequent water changes, but that is a trade-off in time rather than a saving in effort. A refugium with macroalgae is another export path, and it also gives pods a place to reproduce.
Flow is part of filtration. A common starting range for a reef tank is total turnover of about ten to twenty times the tank volume per hour, with less for a fish-only system. The return pump is not circulation: add one or two wavemakers so water moves through the rock and across the surface. Surface agitation drives gas exchange, which keeps oxygen up and carbon dioxide down.
Heating and Water Movement Keep Conditions Stable
Marine animals tolerate a range of temperatures far better than they tolerate swings. Most setups target roughly 76 to 82°F (24 to 28°C). Use a heater rated for the difference between room temperature and tank temperature, and confirm the setting with an independent thermometer rather than trusting the dial.
Two smaller heaters or a controller with a backup heater reduce the risk of a single failed unit cooking or cooling the tank. That redundancy costs money and space, which is the limitation most owners weigh against the risk. It is still cheaper than replacing livestock after a stuck heater.
Water movement has a similar stability role. Wavemakers keep waste suspended so the overflow or mechanical filter can remove it, and they prevent dead spots behind the rockwork. Aim flow across the tank and at the surface rather than blasting sand or a coral directly.
Lighting: Match Output to Livestock
Lighting is the clearest place where the stocking plan should drive the purchase. A fish-only tank needs enough light to see the animals and grow coralline algae; almost any adjustable LED fixture will do. A reef tank needs a fixture with the spectrum and intensity to support photosynthesis in corals, and the requirement rises from soft corals to large-polyp stony corals to small-polyp stony corals.
Depth changes the calculation. A tall tank needs more output to reach the bottom, while a shallow frag-style tank can hit the same light levels with less. Programmable ramps and a consistent photoperiod of roughly eight to twelve hours are more useful than maximum output.
The trade-off is that more light grows more of everything. A new tank with strong lighting and unstable nutrients grows algae faster, and bright light also adds heat and increases evaporation. Light cannot fix a nutrient problem, and it will not keep corals alive if alkalinity and salinity are moving.
Mix Water and Match Salinity Before Anything Goes In
Use RO/DI water, not tap water. Tap water carries chlorine or chloramine, phosphate, nitrate, and sometimes copper from plumbing, all of which cause problems that are difficult to trace later. A small RO/DI unit and a clean storage container are part of the setup, not an optional upgrade.
Mix marine salt according to the manufacturer's ratio, then verify with a calibrated refractometer. A target of about 1.023 to 1.025 specific gravity, or roughly 35 parts per thousand, matches natural seawater closely enough for most systems. Swing-arm hydrometers drift and are a poor choice for a reef tank. Aerate the mix for a few hours, confirm the temperature, and use it within a day or two; stored mixed water is not indefinitely stable.
Top off evaporation with fresh RO/DI water, never with saltwater. Water evaporates, salt does not, so replacing evaporation with salt mix steadily raises salinity. This is one of the most common causes of a tank that "suddenly" looks wrong.
The Nitrogen Cycle Timeline, Explained Without the Fog
Fish waste and uneaten food break down into ammonia, which is toxic. One group of bacteria oxidizes ammonia into nitrite, which is also toxic. A second group oxidizes nitrite into nitrate, which is far less harmful and is removed by water changes and nutrient export.
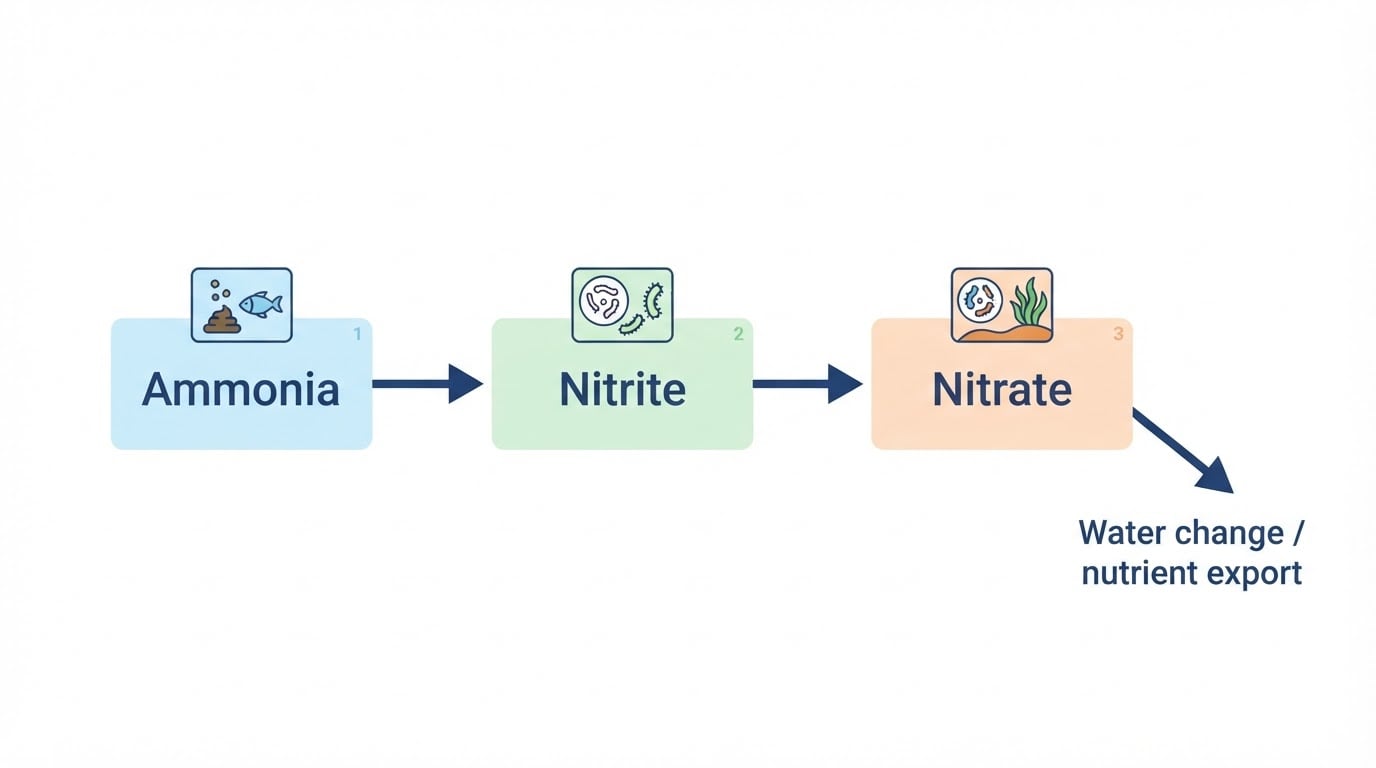
A new tank usually takes about two to six weeks to cycle. Established rock, sand, or a bottled bacteria product can shorten that, while cold water, low pH, poor aeration, or a missing ammonia source can stall it. Test ammonia and nitrite every day or two and keep a simple log so you can see the pattern rather than guessing.
The cycle is complete when ammonia and nitrite both read zero after you have fed the tank or dosed an ammonia source, and nitrate is present. At that point do a water change to bring nitrate down, then add livestock slowly.
Cycling is not a one-time event. The bacteria population grows and shrinks with the waste load, so a tank that handled two small fish can still spike when you add four more at once. That is why the first stocking steps are small and spaced out.
The First Stocking Order, Step by Step
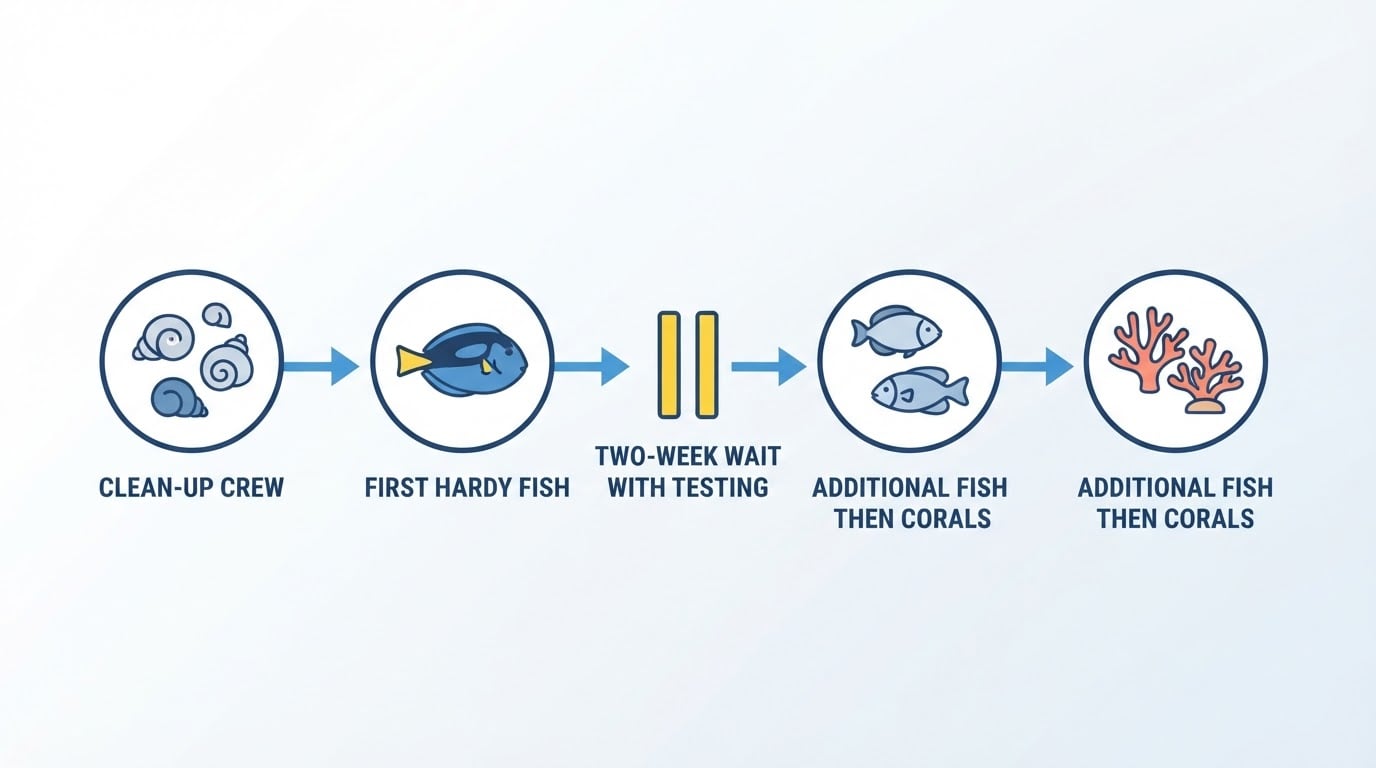
- Clean-up crew first. Once the cycle is finished and there is algae or detritus to eat, add snails and a few hermits. Some hermits prey on snails, so treat the mix as a limitation to manage rather than a package deal.
- One hardy fish next. Choose a captive-bred species that suits the tank size, and add a single small fish or a bonded pair. Quarantine it first if you have a quarantine tank.
- Wait and test. Give the biofilter two weeks or more to catch up. Ammonia and nitrite should stay at zero without water changes masking the result.
- Add fish from least to most territorial. This ordering reduces aggression, because the most territorial fish enters a tank that already has established occupants rather than claiming it first.
- Add corals after the tank is stable. Soft corals are the most forgiving start, followed by large-polyp stony corals, with small-polyp stony corals last. Stability in salinity, alkalinity, and temperature matters more than the calendar.
- Keep a written stocking list. Record adult size, diet, swimming zone, and compatibility before you buy, not after.
Forget the old "one inch of fish per gallon" rule. It ignores adult size, activity level, waste output, and territory. A small, sedentary fish and an active open-water swimmer of the same length place very different loads on the same tank.
Saltwater Tank Setup Checklist
Before you buy
- Confirm floor support and a level spot away from direct sunlight
- Decide fish-only or reef first, because that choice sets the light, skimmer, and flow
- Choose the tank size by the maintenance you will actually do
Build and test
- Leak-test the tank and any plumbing with fresh water
- Rinse the sand and prepare or cure the rock
- Place rock on the glass, then add sand
- Fill with RO/DI water, mix salt, bring to temperature, start circulation and the skimmer
Cycle and stock
- Add an ammonia source or bacteria product and test daily
- Cycle is complete when ammonia and nitrite are zero and nitrate is rising
- Do a water change, add the clean-up crew, then one fish
- Quarantine new fish and wait at least two weeks between additions
Weekly routine
- Top off with fresh RO/DI water
- Test salinity, alkalinity, and nitrate
- Empty the skimmer cup and rinse mechanical media
- Change roughly 10 to 20 percent of the water, adjusting frequency to the bioload
Common Beginner Mistakes
- Filling with tap water. It introduces phosphate, nitrate, and metals that fuel algae and harm invertebrates.
- Topping off with saltwater. Salinity climbs until the tank is no longer in a safe range.
- Adding fish before the cycle finishes. Ammonia and nitrite kill livestock quickly, and no additive reliably shortcuts a stalled cycle.
- Stacking rock on loose sand. The structure can collapse and trap or crush animals.
- Adding many fish at once. The biofilter needs time to grow to match the new waste load.
- Buying livestock before the equipment is stable. A cheap fish is expensive if the tank is not ready.
- Over-lighting a new tank. Strong light plus unstable nutrients produces algae, not a healthy reef.
- Cleaning the biofilter. Rinsing rock, sand, or biomedia in tap water removes the bacteria the system depends on.
- Chasing pH with additives. Most pH problems come from poor gas exchange, low alkalinity, or a closed room, not from a missing bottle.
- Skipping quarantine. One untreated fish can introduce disease to the whole tank.
What to Verify Before You Buy Livestock
Check the basics again before you spend money on animals: ammonia and nitrite at zero, salinity stable across a few days, temperature steady, the skimmer running, and enough flow to keep waste moving. If any of those is not true, wait. Livestock is the last purchase in a saltwater tank setup, not the first, and a tank that is ready will make the next year of maintenance far easier.
A saltwater tank is not difficult because of the equipment. It is difficult because the equipment, the water chemistry, and the stocking pace all have to agree. Get the system matched, let the cycle finish, and add animals slowly; the rest of the hobby gets much more forgiving after that.